Media library
Media library
Find images, documents and videos that appear elsewhere on this site. Use the filters below to search by name, type or tag.
Document
QUICK GUIDE - FINAL with new clamp link instructions.pdf
Image

Quick Connect Receiver.jpg

Quick Grip and Small Tablet Tray

Quick Grip attached to tablet tray

quick grip for phone_ cords for tablet

quick grip on qrp

Quick Grip on RAM plate to offset to side of speech device or tray

Quick Grip on RAM plate to offset to side of speech device or tray

Quick Grip on RAM plate to offset to side of speech device or tray
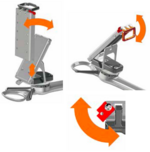
Quick release diagram

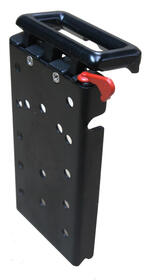
Quick Release Plate
Quick Release Plate closed

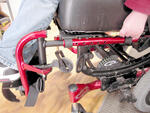
Quick Release Plate and Quick Connect Receiver attached to mounting plate on back of TD Pilot

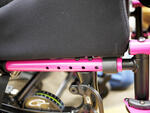
Quick Release Plate on arm

quickie 2 lx

quickie 2 lx

quickie 2 lx

quickie 2 lx

quickie 2 lx

Quickie 2 Mounting solution 1a.jpg

Quickie 2 Mounting solution 1b.jpg

Quickie 5R front view with 1.125" Collar Clamps, WC-AP4, and WB2

Quickie frame
Quickie Iris
Quickie Iris

Quickie Iris frame tube sizes.jpg

Quickie Iris hardware attached AP4_AAP_WB2

Quickie Iris hardware close up WC_AP4 WC_AAP and WB2

Quickie Q500

Quickie Q500 with Sedeo Pro Seating

Quickie Q700 M

Quickie Q700 M track

Quickie TS

Quickie TS

Quickie TS use 1" bridge clamps
")
Quickie Xperience Power Wheelchair (has T-Nut track)

quickie zippie 2 close up of attachment hardware

quickie zippie 2 _ with 1" tubing on horizontal and vertical tubes. 7/8 inch on J-tube

Quickie Zippie GS

Quickie Zippie Iris

quickie zippie voyage iso view.jpg

quickie zippie voyage top view.jpg

quickie zippie voyage.jpg

QUICKIE-SR45-Manual-Tilt-Wheelchair-tiedown.jpg

QUICKIE-SR45-Manual-Tilt-Wheelchair.jpg

QUICKIE-TS-Manual-Tilt-Wheelchair.jpg

quickie_helium.jpg

quickie_helium.jpg

QU_Zone2-iPad.JPG

QU_Zone2_Brake.JPG

QU_Zone2_Brake.JPG

QU_Zone2_Brake.JPG

QU_Zone2_OvalTC-AP2-LAE-WB2.JPG

QU_Zone2_OvalTC-AP2-LAE-WB2.JPG

R1 Bridge Clamp Set with the WC-AAP

R82 Crocodile Walker double decker.jpg

R82 Crocodile Walker side view double decker single arm and phone

R82 Multi Frame with X-Panda seating

R82-Combi_Track.JPG

R82-Combi_Track.JPG

R82-Expanda_Track.JPG

R82-Expanda_Track.JPG

R82-Expanda_Track.JPG

R82-HiLo.JPG

R82-HiLo.JPG

R82-HiLo_SQtube_Drill.JPG

R82-HiLo_SQtube_Drill.JPG

R82-HiLo_TrayInserts.JPG

R82-HiLo_TrayInserts.JPG
")
R82-HiLo_TrayInserts_AP4.JPG

R82-HiLo_TrayInserts_AP4.JPG

R82-Kudu.JPG

R82-Kudu.JPG

R82-Kudu_R1B_AAP_AP4.JPG

R82-Kudu_R1B_AAP_AP4.JPG

R82-Kudu_Tube.JPG

R82-Kudu_Tube.JPG

R82-Multi.JPG

R82-Multi.JPG

R82-Multi_Bridge-off-horiz.JPG

R82-Multi_Bridge-off-horiz.JPG

R82-Multi_close.JPG